
Here are the BIG changes:
- Added support for Excel cost data export on Mac
- Dialogs size and position now persists on Mac
- CSV export of reports is now replaced with Excel (xlsx) export. This was done in order to fix the many bugs and limitations of using CSV files with non-English characters as well as issues related to regional settings in Excel.
- Length of Profile Members is now calculated based on the average length of the extruded geometry. Previously, length of Profile Members was calculated based on the length of the extrusion path. If the profile had x and y offsets, the old method could result in inaccurate length calculations. (More info below)
- Area of Wall-like Profile Members now deducts area of openings from the area calculation. (More info below)
Other key changes include:
- Added ability to import cost data using wildcard characters (see below for details)
- Added ability to input a forward slash (/) symbol in the cost data 'factor' field to calculate the factor value (eg. entering /2 or 1/2 will set the factor field to 0.5)
- Fixed a bug where if you modify the cost data for an Object (Object$) and then select a new object, the modified cost data for the previously selected object would not be saved.
- References to 'Layer' have now been replaced with 'Tag'
- Updated translations and added new Italian translation
- Clicking a text input field now auto-selects the text
- Removed the Print button for exported reports
- other minor bug-fixes
- no longer compatible with SU2016
Improved Length Calculation for Profile Members
In previous versions of Quantifier Pro, the length of a Profile Member (i.e. an extruded object created using Profile Builder) was calculated based on the length of the underlying path that was used to create it. The 'path' is the series of points that you clicked to create the Profile Member (or the edges that you selected when using 'build along path')
However, due to how x and y offsets are implemented in Profile Builder, the length of the underlying path could be quite different than the visible length of the extruded geometry especially if larger offsets are being used. In the video below, the length of all 3 Profile Members would have been considered equal (2m) in older versions of Quantifier Pro but in version 1.2, the length is more accurate since it is now based on the average length of the extruded geometry.
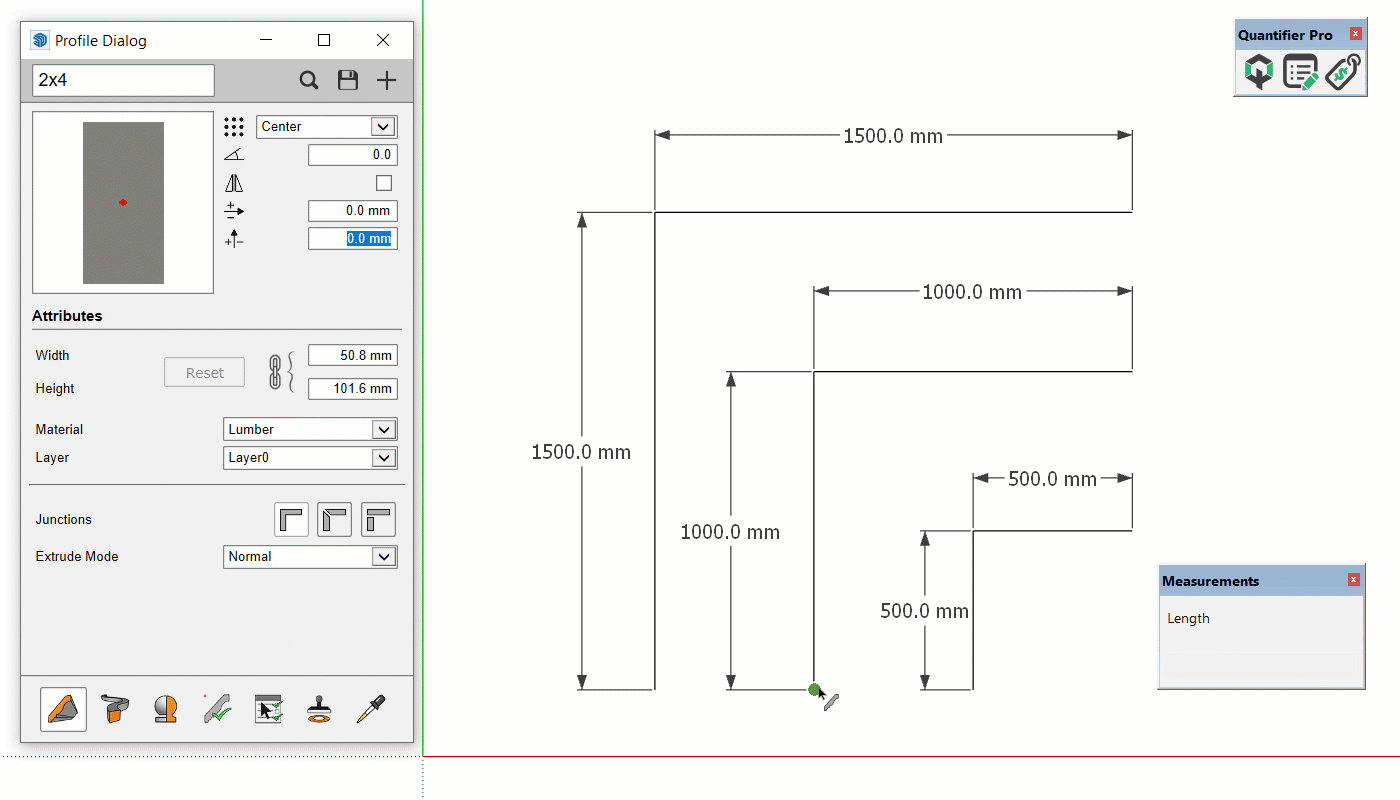
Prior to version 1.2, Quantifier Pro would show the same length for all 3 Profile Members
Hole Area Reduction for Wall-like Profile Members
In previous versions of QP, the area of a Profile Member was calculated based on the length of the object multiplied by the greater of the height or width.
While this method resulted in high accuracy for most situations, it was not able to account for any holes that may have been created in the Profile Member (windows, doors, etc.)
Profile Builder has the ability to create extremely complex extrusions of arbitrary profile shapes and create holes using arbitrary profiles at various depths and orientations. Due to this level of complexity, it would not be possible for Quantifier Pro to be able to calculate the area reduction from holes without a major rework of both Profile Builder and Quantifier Pro.
Therefore, we decided to limit our new approach to only 'Wall-like' Profile Members since we believe that this covers the vast majority of use-cases where this feature is desired.
A 'Wall-like' Profile Member is defined as:
- Rectangular profile (90 degree corners)
- Height greater than width
- Has a horizontal path (all path points have the same Z value within tolerance)
Any 'Wall-like' Profile Members will have their hole area deducted from their total area. This area deduction calculation also has some limitations but should be robust enough for most use-cases.
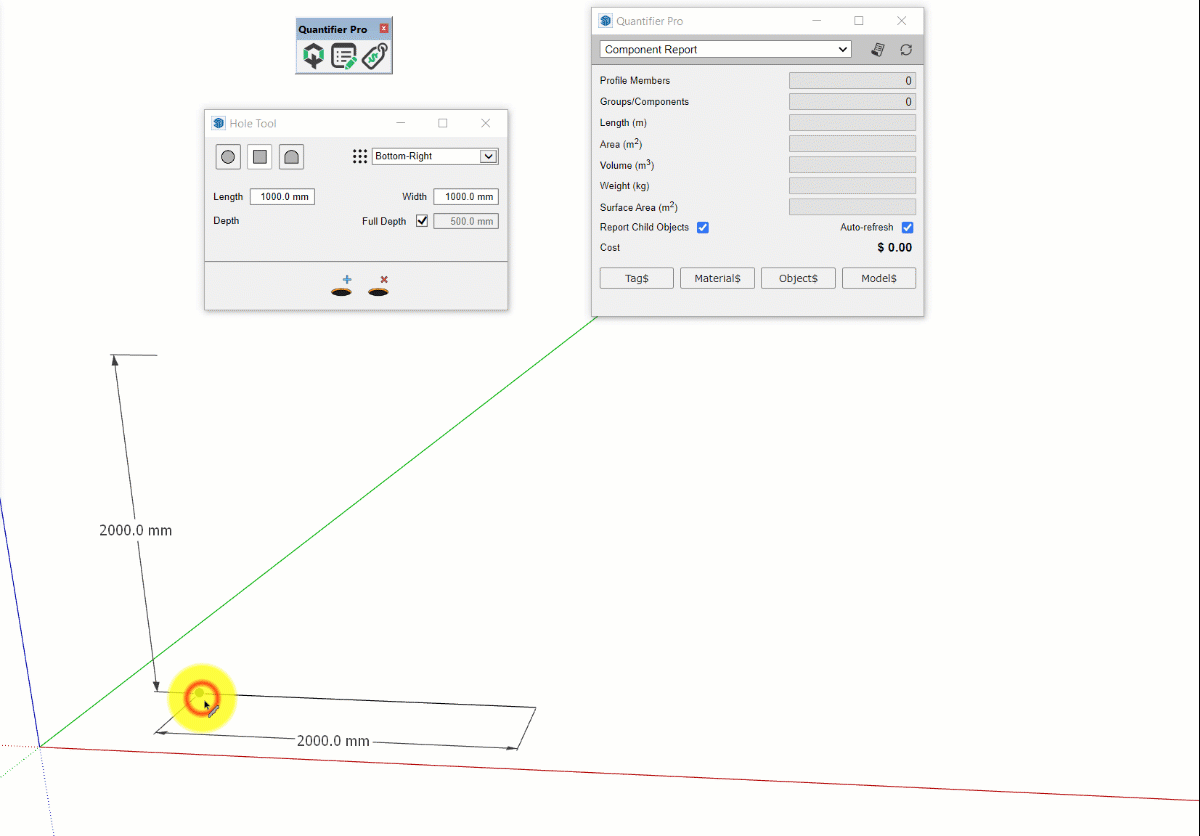
Prior to version 1.2, Quantifier Pro would show the same area for both of these wall Profile Members
Using Wildcards when importing Cost Data
For those of you who are familiar with importing cost data from Excel, we recommend that you try out the new wildcard feature. With this feature, you don't need to specify the exact name of a tag, material, or component when importing the data. Just input a portion of the name and then use the wildcard character * to match the rest of the name.

Use the wildcard name Concrete* to import the same cost data line for all Tags that start with the word 'Concrete' (Concrete-Slab, Concrete-Wall, Concrete-Footings, etc.)
Comments
10 comments
Good afternoon . when inserted into the excel file layout - an error occurs with the duration and size values, they are duplicated, although I don’t see such a problem in the excel file

Thanks for the update! These are awesome new features and fixes, but I'm still looking for the "round up" option for quantities. ;) Thanks Dale! Peace be with you!
thanks Braden! This feature is still on our radar and will likely happen at some point. Unfortunately I cannot say when because I simply don't know.
Is there a way to measure an object in f2 by the tag without subtracting the holes?
If the object was created using Profile Builder and is rectangular like a wall, the holes will always be deducted (as of version 1.2). For other types of profiles, the holes will not be deducted when calculating area.
I see. We usually usually will estimate sheetrock by the measurement of the wall as if there's no holes. An accurate amount of waste is hard to figure for when the size of the openings is so variable. My current work around is a saving a copy of the model with no openings.
A cut-out to sq/ft ratio is useless- it isn't consistent. We usually install all the sheathing, then use the RO to cut out the correct sized holes for windows and doors. This way we have fewer seams, it's easier to figure out materials, and it's easier and quicker to install.
I use Medeek wall quite a lot, and having the figures for sheathing and etc is awesome, except for the holes getting cut out.
Also, I noticed that turning off the visibility of a tag folder does not remove the cost items associated with the tags in that folder from reports. One must open the tag folders, and hide the individual tags. When dealing with complicated tag hierarchies, this becomes very cumbersome. It would be very useful if there was a toggle for the option of removing tags from reports by hiding tag folders.
Please don't think I'm railing on you. I just have ideas. :D
Hi Braden - how are you setting up your sheathing cost data? Are you using Material$ and applying a material to represent the sheathing or are you using Tag$ sq footage (projected area)? And are you using Profile Members as your walls or some other method?
Regarding the tag folder issues, I have logged this as an issue which we will look at for a future update. Thanks for bringing it to my attention.
I am using Medeek wall assemblies and the tags his plugins create.
There is nesting involved:
1 -- Wall Assembly (Untagged)
2 -- Sheathing (wall_sheath)
3 -- Raw Geometry (Untagged)
2 -- Framing (wall_frame)
2 -- etc. and so on...
I simply use the tag "wall_sheath" and set the Input to "ft²" and then set the Factor for "/32" to get x amount of 4x8 sheets.
The sheathing is essentially a skinny box (solid group), but the plugin will punch holes in the cladding and sheathing for windows and doors while properly framing them out.
Here's a gif showing how I get the sheathing quantified:
https://youtu.be/HTOBEgMsG-4
Please sign in to leave a comment.