Launch the Tool

Circular Holes
1. Change the diameter to set the size of the hole
2. Segments is the number of divisions around the circular hole. More segments results in a smoother looking hole.
3. Adjust the placement point of the hole profile.
4. Set the depth of the hole or enable full depth to punch through the target object.
Rectangular Holes
1. Set the horizontal width of the hole.
2. Set the vertical height of the hole.
3. Adjust the placement point of the hole profile.
4. Set the depth of the hole or enable full depth to punch through the target object.
Custom Profile Holes
1. Click this button to use a hole Profile from an existing Profile Member in your model.
2. Click this button to edit a custom hole profile. The Profile dialog will open.
3. Click the 'Plus' button to create a new hole profile from a selected face in your model.
4. Click this button to load a saved hole profile.
5. Click the 'OK' button to finish editing the custom hole Profile.
Note: Material, Tag, Junctions, and Extrude Mode settings are not used for custom hole Profiles.
Adding Holes to Objects
The hole tool will cut through the selected groups and components. It is recommended (but not required) to first select the objects you want to cut before using this tool.
- Select a group or component for cutting (recommended)
- Click the 'Add Holes' button to launch the tool.
- Move the mouse over a reference point and press the CTRL or OPTION key to place a reference point (optional).
- Set the position of the hole with the mouse or key-in a distance value from the reference point that was set in step 3.
- Click or press 'ENTER' or 'RETURN' to create the hole.
TIP: Use the SHIFT key to lock inferencing when positioning the hole.
If the object is not cut as expected, make sure that the object to be cut is selected. You might not realize that another object off-screen is actually selected and being cut.
Cut through Nested Groups and Components

The hole tool can create holes through nested geometry (including assemblies).
Holes in Profile Members and Assemblies are Parametric
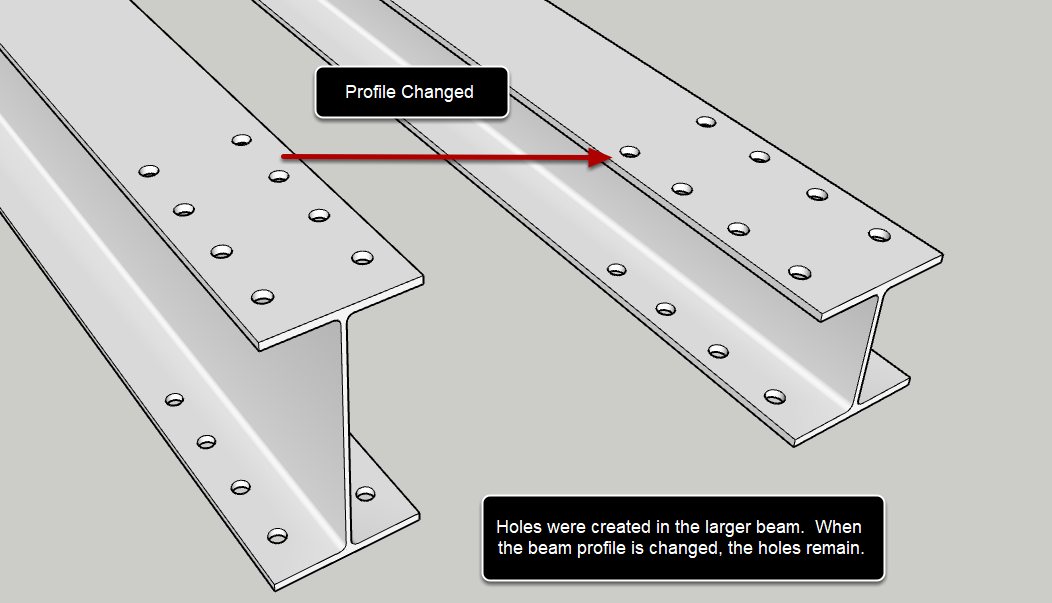
If you create a hole in a Profile Member or Assembly, the hole will be maintained even if the object is edited later with any of the Profile Builder tools.
New in v4, holes are now maintained in Assemblies! In previous versions, holes were only maintained for Profile Members.
Note: Profile Builder will attempt to maintain the holes when the object is edited, but it is not always possible. Sometimes, holes will need to be re-added after making edits.
Holes cut in basic Groups and Components are not parametric and can not be edited.
Removing Holes
New in v4, holes can now be removed from Assemblies as well as Profile Members!
- Click the 'Remove Hole' button to launch the tool.
- Click a hole in an object to remove the entire hole.
Note: You must be able to select the object with the SketchUp Select tool in order to remove a hole. If the object with the hole is contained within a parent group, first double-click the parent group and then you should be able to remove the holes from the object.
You can remove multiple holes in one click if you first preselect them using the Hole Select Tool.
Holes can not be removed from basic Groups and Components.
Selecting Holes
New in v4, you can now select multiple holes so that they can be moved, edited, or deleted all at once.
- Click the 'Select Holes' button to launch the tool.
- Click a hole to select it.
- Select additional holes by holding CTRL or OPTION and clicking
- When hovering over a hole, the green color indicates that it will become selected when clicked.
Modifier Keys:
ESC = Clear selected holes
CTRL = Add to selection
SHIFT = Toggle selection
SHIFT + CTRL = Subtract from selection
Blue color indicates that the hole is currently selected. Green indicates that the hole will be selected when clicked. Red indicates the hole will be removed from the selection when clicked.
Tips:
- It is possible to select multiples holes within different objects. However, you can only select holes within objects that are selectable using the SketchUp select tool You cannot select holes that are inside parent or child objects.
- If you create a hole in an assembly, you must be 'at the assembly level' to be able to select it. Even if the hole got cut through a Profile Member within the assembly, you can only interact with the hole from the assembly level, not the Profile Member level. A helper tooltip should be displayed if you hover your mouse over an un-selectable hole.
Moving and Copying Holes
New in v4 is the ability to move and copy holes within Profile Members and Assemblies!
- Select one or more holes using the Hole Select Tool (optional)
- Click the Move Hole Tool
- Click a reference point for the move. If no holes were preselected, the reference point must be on a hole.
- Move the mouse to the new hole position.
- Click to confirm and regenerate the hole in the new position.
During step 4, you can key-in a measurement to move the hole a precise distance. The hole is created in the new position as shown below.
To copy holes, tap CTRL or OPTION during step 4. The cursor will change and the original hole will remain highlighted.
While in copy mode, when clicking the new hole position, the original hole will remain and a new copy will be generated at the specified location.
Similar to the SketchUp move tool, you can create an array of holes (multiple copies) by keying in * or / followed by a number after performing the move.
For example, key-in /3 after moving the hole to create 3 copies at equal spacing.
Editing Hole Attributes
New in v4, you can edit the properties of existing holes. First select the holes you wish to edit using the Select Hole Tool.
With the holes selected, change the settings in the dialog. You can change the hole type, size, placement point, and other settings.
Note the position of the blue dot and arrow for each hole. This represents the target point for the hole. The hole profile will be positioned based on the target point and placement point. It will also be oriented based on the arrow direction.
After modifying the hole settings, click the 'Apply Attributes' button in the hole dialog.
In this example, the selected holes are changed to an arched window with a top-middle placement point. The position of the target point does not change, but the relative position of the hole profile results in the target point being at the top-middle.
Comments
0 comments
Please sign in to leave a comment.